Embedding Bold BI Dashboards in Blazor using the Embedded SDK
The sample has been provided in the following sections for Blazor WebAssembly, which demonstrates the dashboard rendering available on your Bold BI server. It is followed by steps to create a new embedding application in Blazor WebAssembly on your own.
NOTE: Reading the Getting Started section of the documentation is the best way to begin. The
Getting Startedguide provides you with sufficient information that you need to know before working on the sample.
Prerequisites
How to run Blazor WebAssembly sample
-
Please get the Blazor WebAssembly sample from GitHub.
-
Please make sure that you have enabled embed authentication on the
embed settingspage. If it is not currently enabled, please refer to the following image or detailed instructions to enable it.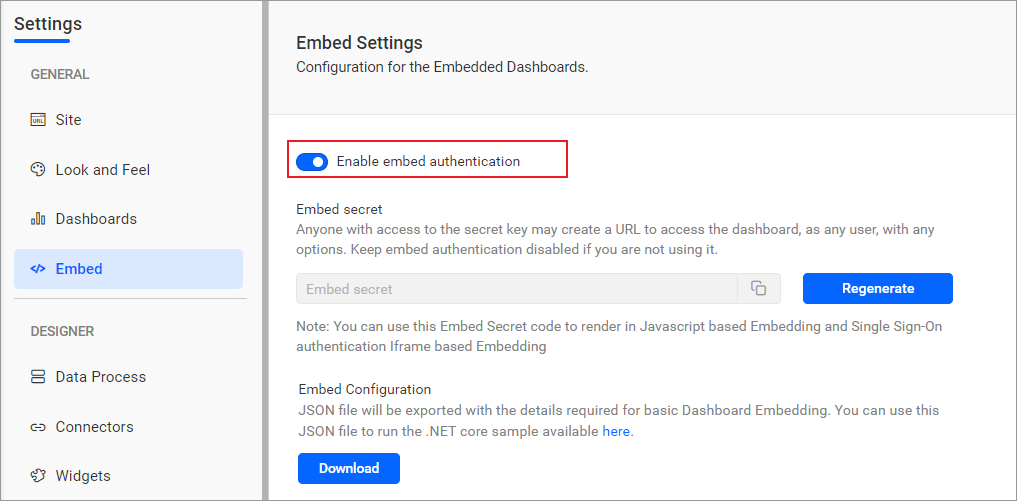
-
To download the
embedConfig.jsonfile, please follow this link for reference. Furthermore, you can refer to the image below for visual guidance.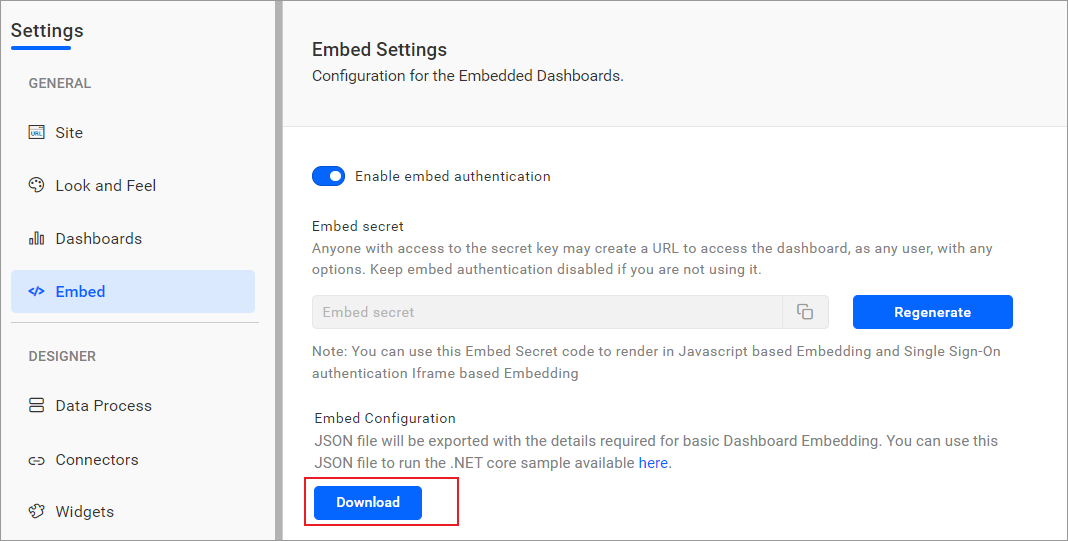
-
Please copy the downloaded
embedConfig.jsonfile and paste it into theServerfolder location within the application. Please ensure you have placed it in the application, as shown in the following image.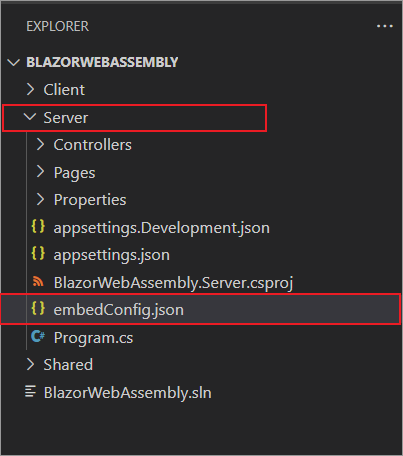
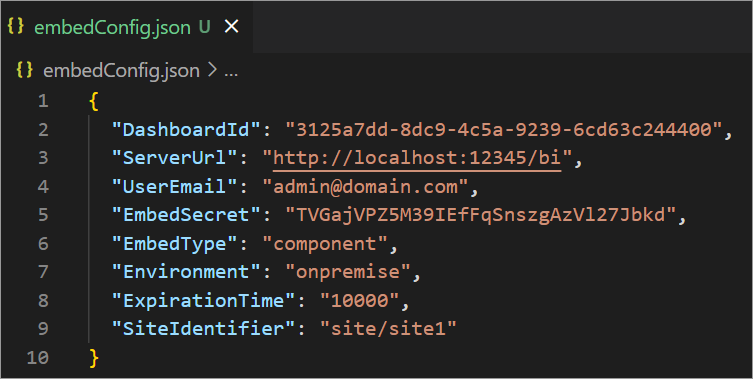
ServerUrl Dashboard Server BI URL (ex: http://localhost:5000/bi, https://demo.boldbi.com/bi) SiteIdentifier For the Bold BI Enterprise edition, it should be like site/site1. For Bold BI Cloud, it should be an empty string. UserEmail UserEmail of the Admin in your Bold BI, which would be used to get the dashboard list. EmbedSecret Get your EmbedSecret key from the Embed tab by enabling the Enable embed authenticationin the Administration pageEnvironment Your Bold BI application environment. (If it is a cloud analytics server, use `BoldBI.Environment.Cloud`; if it is your server, use `BoldBI.Environment.Enterprise`) DashboardId Item ID of the dashboard to be embedded in your application. ExpirationTime Token expiration time. (In the EmbedConfig.json file, the default token expiration time is 10000 seconds) -
Please open your project in
Visual Studio Code. -
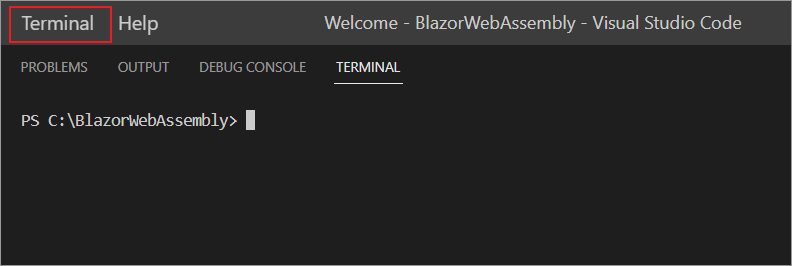
Then, open the
terminaland navigate to theServerproject directory by usingcd command(e.g.,cd C:\BlazorProject\Server). -
To run the application, use the command
dotnet watch runin the Visual Studio Code terminal.
How the Blazor WebAssembly sample works
-
The application checks if
embedConfig.jsonis available; if it is, itdeserializesand stores the content inEmbedDetails. Otherwise, it throws an error.
-
To generate an access token, call the
TokenGenerationAPI with the providedembedConfigvalues.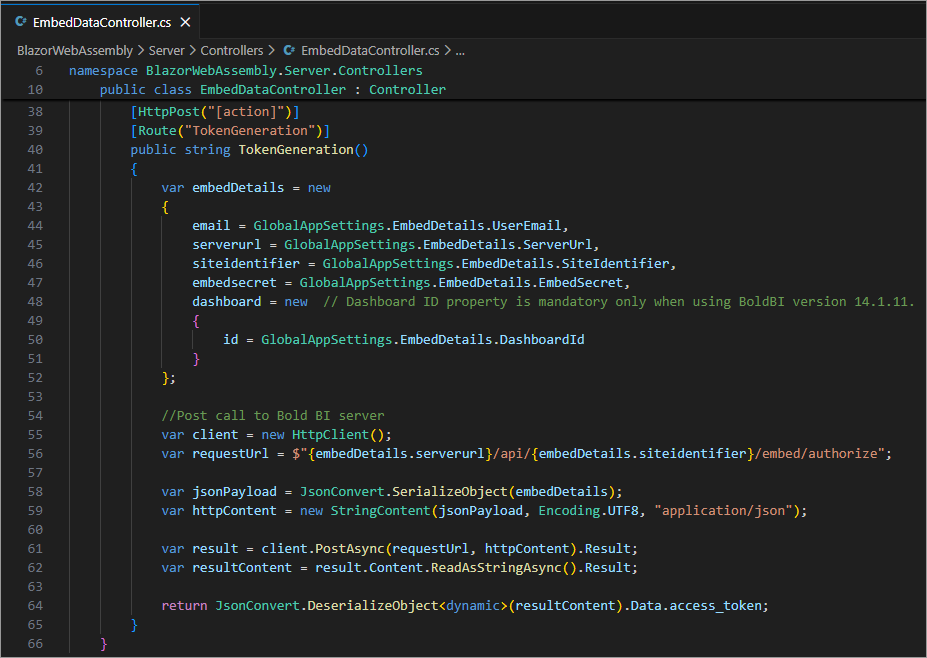
-
Once the token is generated, it will be returned to the
index.htmlfile and the dashboard will start to render it.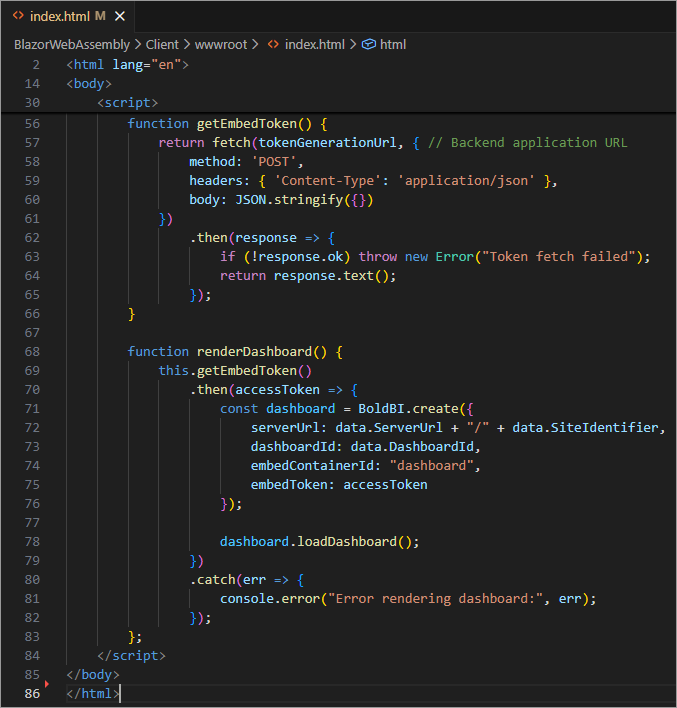
Steps to create new Blazor WebAssembly application to embed dashboard
-
Please create a folder in the desired location and open it in Visual Studio Code.
-
Open the terminal in the Visual Studio Code. Please refer to the following image.
-
In order to create a new project, we must execute the following command in the terminal.
dotnet new blazorwasm --hosted -
Please make sure that you have enabled embed authentication on the
embed settingspage. If it is not currently enabled, please refer to the image or detailed instructions provided. -
To download the
embedConfig.jsonfile, please click on the following link for reference. Furthermore, you can use the image below for visual guidance.
-
Please copy the downloaded
embedConfig.jsonfile and paste it into theServer folderlocation within the application. Please make sure that you have placed it in the application, as shown in the following image. -
In the
Shared project, create a model class asEmbedClass.csto define the following properties. These properties are used to retrieve the dashboard details from the server.Open the terminal and navigate to the
Shared projectdirectory using the cd command(e.g.,cd C:\BlazorProject\Shared). Ensure that you include the necessary packages, such asSystem,System.Collections.Generic,System.Runtime.Serialization,System.Linq,System.TextandSystem.Threading.Tasks, in theEmbedClass.csmodel file.[DataContract] public class EmbedClass { [DataMember] public string embedQuerString { get; set; } [DataMember] public string dashboardServerApiUrl { get; set; } } public class EmbedDetails { public string Environment { get; set; } public string SiteIdentifier { get; set; } public string ServerUrl { get; set; } public string EmbedSecret { get; set; } public string UserEmail { get; set; } public string EmbedType { get; set; } public string DashboardId { get; set; } } -
In the
Shared Project, create another model class calledGlobalAppSettings.csto define the following properties. These properties will store theembedConfig.jsonfile object within theGlobalAppSettings.public class GlobalAppSettings { public static EmbedDetails EmbedDetails { get; set; } } -
In the
Client project, the following scripts and style sheets are mandatory to render the dashboard. Include the following script tag in your\wwwroot\index.htmlpage.<script type="text/javascript" src="https://cdn.boldbi.com/embedded-sdk/v15.2.6/boldbi-embed.js"></script> -
Inside the
<body>tag, implement a function to render the dashboard.<script> var data; var authorizationServerUrl = "api/EmbedData/AuthorizationServer"; async function fetchDataAndHandleErrors() { try { const response = await fetch('/api/EmbedData/GetConfig'); const embedConfig = await response.json(); // Transform camelCase keys to PascalCase const transformedEmbedConfigData = { DashboardId: embedConfig.dashboardId, EmbedType: embedConfig.embedType, Environment: embedConfig.environment, ServerUrl: embedConfig.serverUrl, SiteIdentifier: embedConfig.siteIdentifier }; data = transformedEmbedConfigData; } catch (error) { window.location.href = 'api/EmbedData/EmbedConfigErrorLog'; } } fetchDataAndHandleErrors(); function renderDashboard() { this.dashboard = BoldBI.create({ serverUrl: data.ServerUrl + "/" + data.SiteIdentifier, dashboardId: data.DashboardId, embedContainerId: "dashboard", width: "100%", height: window.innerHeight + "px", authorizationServer: { url: authorizationServerUrl } }); this.dashboard.loadDashboard(); } </script> -
Open the
Index.razorfile in theClient project, create the DOM element with the iddashboardand implement the code as shown to invoke therenderDashboard()method.@page "/" @inject IJSRuntime JsRuntime <div id="dashboard"> </div> @functions { protected override void OnAfterRender(bool firstRender) { JsRuntime.InvokeAsync<object>("renderDashboard"); } } -
Open the
MainLayout.razorfile in theClient projectand replace the code mentioned below.@inherits LayoutComponentBase <div class="page"> <main> <article class="content px-4" style="padding-left: 0px !important; padding-right: 0px !important;"> @Body </article> </main> </div> -
In the
Server project, create theEmbedDataController.cscontroller under the Controllers folder. To obtain specific dashboard details, define an API calledAuthorizationServer()which utilizes theGetSignatureUrl()method to generate the signature. In this API, append theembedQueryString,userEmail, and the value from theGetSignatureUrl()method as query parameters in the URL to the authorization server of the specific dashboard.Open the terminal and navigate to the
Server projectdirectory using the cd command (e.g.,cd C:\BlazorProject\Server). Ensure that you include the necessary packages, such asMicrosoft.AspNetCore.Http,Microsoft.AspNetCore.Mvc,System,System.Collections.Generic,System.Net.Http,System.Linq,System.Text,System.Threading.Tasks,Newtonsoft.Json,BlazorWebAssembly.Shared, andBlazorWebAssembly.Client.Pages, in theEmbedDataController.cscontroller file.[Route("api/[controller]")] [ApiController] public class EmbedDataController : Controller { [HttpGet] [Route("GetConfig")] public IActionResult GetConfig() { var jsonData = System.IO.File.ReadAllText("embedConfig.json"); string basePath = AppDomain.CurrentDomain.BaseDirectory; string jsonString = System.IO.File.ReadAllText(Path.Combine(basePath, "embedConfig.json")); GlobalAppSettings.EmbedDetails = JsonConvert.DeserializeObject<EmbedDetails>(jsonString); return Json(new { DashboardId = GlobalAppSettings.EmbedDetails.DashboardId, ServerUrl = GlobalAppSettings.EmbedDetails.ServerUrl, EmbedType = GlobalAppSettings.EmbedDetails.EmbedType, Environment = GlobalAppSettings.EmbedDetails.Environment, SiteIdentifier = GlobalAppSettings.EmbedDetails.SiteIdentifier }); } [HttpPost("[action]")] [Route("AuthorizationServer")] public string AuthorizationServer([FromBody] object embedQuerString) { var embedClass = JsonConvert.DeserializeObject<EmbedClass>(embedQuerString.ToString()); var embedQuery = embedClass.embedQuerString; // User your user-email as embed_user_email embedQuery += "&embed_user_email=" + GlobalAppSettings.EmbedDetails.UserEmail; //To set embed_server_timestamp to overcome the EmbedCodeValidation failing while different timezone using at client application. double timeStamp = (int)DateTime.UtcNow.Subtract(new DateTime(1970, 1, 1)).TotalSeconds; embedQuery += "&embed_server_timestamp=" + timeStamp; var embedDetailsUrl = "/embed/authorize?" + embedQuery + "&embed_signature=" + GetSignatureUrl(embedQuery); using (var client = new HttpClient()) { client.BaseAddress = new Uri(embedClass.dashboardServerApiUrl); client.DefaultRequestHeaders.Accept.Clear(); var result = client.GetAsync(embedClass.dashboardServerApiUrl + embedDetailsUrl).Result; string resultContent = result.Content.ReadAsStringAsync().Result; return resultContent; } } public string GetSignatureUrl(string message) { var encoding = new System.Text.UTF8Encoding(); var keyBytes = encoding.GetBytes(GlobalAppSettings.EmbedDetails.EmbedSecret); var messageBytes = encoding.GetBytes(message); using (var hmacsha1 = new System.Security.Cryptography.HMACSHA256(keyBytes)) { var hashMessage = hmacsha1.ComputeHash(messageBytes); return Convert.ToBase64String(hashMessage); } } } -
Navigate to the
Server projectdirectory using the cd command, such ascd C:\BlazorProject\Server. Run yourBlazor WebAssemblysample with the commanddotnet watch runin Visual Studio Code.